Showing posts with label Craft. Show all posts

May 11, 2012

A Look Back at the Jungle Mobile

You may remember a while back that I posted about a jungle mobile I designed for a friend's baby.  Recently I got an update on how it's holding up, and I was so tickled with the results.

Ellie's crib, with mobile
This is Ellie's room.  The alphabet tree still needs leaves I'm told, but that's where the mobile hangs!

Ellie with her Tiger and Elephant
And this is Ellie holding two of the animals.  She's now 1!  I'm really happy to see that they get used for play time, since that's how I envisioned them working.  Also, I just can't believe how big they look in her hands.  Her mom tells me that Ellie cries whenever they have to be taken away for things like bath time.  !!  I'm not a fan of babies crying, but wow is that a compliment :D

March 01, 2012

Changes and Challenges

We have a friend living with us right now.  I don't want to put her business out there, so let me just say that life is throwing her a curveball at the moment, and we're doing what we can to help her transition.  But what this means is that she's here with her two cats.

Well, it's time for a bit of a side note.  I thought I had been documenting the fact that my cats are big wusses, especially Winston.  To some extent, I have, but there are SO MANY times he has been just outright ridiculous.  Like the time I found a kitten in the hallway of our 2007 apartment and took it in until its owner saw my fliers in the building and retrieved it (Winston spent the entire time under our bed).  Or the time that a vet friend picked up a recently fixed kitten on her way to visit (Winston attempted to hide under the bed, but the kitten wanted to say hi, so he spent the night on top of our cabinets.  Even an hour after the kitten left, I had to go up and retrieve him so he would know the kitten was gone.  He still hissed for the rest of the night.)  And apparently I never even told you about the time I was cat sitting for these same cats when they were itty bitty babies (Winston and Felix both spent the entire time hiding and hissing, both at the kittens and each other).  *sigh*  Well, now you know, Winston is a baby.

So with her cats here again, and pretty much adults this time, things are tense.  I thought mine could use some socialization anyway, now that they don't have much of a choice about it.  We've only been shutting her cats in her room at night, and letting everyone mingle during the day.  Winston spent most of the day under the bed; lots of hissing and growling.  Felix spent the day in a corner staring everyone down and hissing whenever someone had the audacity to come within her view.

_MG_7391
Winston, the first time he met these cats back in July.
Today though, things seem to be a bit better.  Both of my cats seemed to follow their general day time routine, which admittedly involves mostly sleeping.  But they did it in the living room with me, and ate, and only hissed if the kittens came within six feet of them and kept walking in their direction.  There was even a moment where Winston slept on the couch, and Carmen hung out for a while about 3 feet from him.  I was so proud.  They're still pretty stressed out, but there's definite improvement.  We might make them social yet.  Or at least tolerant.  I'd be happy with tolerant.

I've been pretty busy this week.  Band practice, working out, bead shopping...  I'm attempting to sew a couch cover for my friend Sarah.  I've never done anything like this before.  We found some covers in the as-is section of Ikea that she thought would fit her couch, but they're actually too small.  Luckily, we got two different ones, and we're attempting to dye the lighter one and take them all apart and then put them back together in a way that fits the couch.  We're thinking mostly the blue with grey panets running down the edge next to the arms.  I'm nervous about screwing it up, but excited to try something new.  Also, First Friday is tomorrow, so I'm trying to prep for that (in addition to all the galleries opening, artists set up shop on the sidewalks all around the neighborhood).

Also, Saturday we leave for our first group snowboarding trip since the first one I attended back at the end of 2004.  I had no gear for this, so I've been attempting to accumulate cheap, used gear that was in great shape.  I'm excited for this trip, because I know how much DS used to love snowboarding.  And pretty much all of his friends from SC do it, and they have this trip every year.  But I'm nervous, because the only other time I've tried it, I had to go to the doctor afterward to find out I had two bruised ribs and a bruised tail bone.  Either way, it will be fun, because both our SC friends and our SB friends will be there.  I just really hope all this working out in the last year will have me ready to be at least marginally successful.

Lots of things happening!  We are working hard to make sure that all of these challenges becomes paths to better things.
February 10, 2012

Making Some Rings

I woke up this morning bright and early with a fully formed idea in my head for a flower ring made out of shrink plastic.  Rings made from this material, commonly known as Shrinky Dinks, are not new to me.  I have one of those Klutz books all about making jewelry out of the stuff.  Basically, you just cut a long strip, decorate it, shrink it, and then bend it into a circle while it's still hot.

So I thought, if you can make a circle while it's still hot, why not other shapes?  I envisioned a three dimensional flower, and then set out to make it happen.  I really love the way it turned out, as did my friend Sarah, to whom I gave it.  She has metal sensitivities, and so the shrink plastic lets her wear rings without getting all itchy.  Bonus!

These designs still need some work.  Sarah broke her band while playing with it nervously.  While I could easily tell people not to pull out on the band, I'd also like them to be a bit more sturdy.  At any rate, I still think they're kind of amazing, and will be cooking up more ideas for these soon.  What do you think?

If you're seeing this note, be sure to visit http://sleepgoblin.blogspot.com with Flash to see the photos. Get the flash player here: http://www.adobe.com/flashplayer

November 20, 2011

New Painting and Table Runner

Little Nova, by Kaitlin Deering - 2009

This is mine and DS's first real art purchase.  The painting is titled Little Nova, and is by our friend Kaitlin Deering.  I adore it.  The rainbow colors, the little flecks of white in the black background.  It's magical and wondrous and makes me feel like I'm witnessing some miracle of space or the northern lights or something.

Felt Leaf Table Runner by Sleep Goblin Crafts - 2011
Also new, this table runner.  I finished it last night.  It's just felt cut in leaf shapes with some running stitches for veins, all connected together.  I wanted something that was very fall, and cheap and easy to make.

Felt Leaf Table Runner by Sleep Goblin Crafts - 2011
Now we just need a few more chairs, and this table will be ready for a dinner party.

November 16, 2011

2011 Sleep Goblin Ornament

I have been quietly re-opening my Etsy shop for business over the last few weeks.  You might have noticed some activity on the store's Facebook page if you follow that.  I also started a Google+ page, just to cover all my bases.  So if any of you want some custom stuff made by Christmas, now is a great time to let me know so it can be done in time!

But the more important thing I have to tell you is that the 2011 ornament is done!  Well, designed.  I still need to "mass produce" them.  They're themed after the carol 12 Days of Christmas, specifically a partridge in a pear tree.  It took a long time to figure this one out.  I had originally planned on doing it last year, but it just didn't come together.  This year I had a brilliant idea for layered paintings, but I couldn't figure out how to incorporate the partridge in a way that made me happy.  I still love the layer idea, but it will have to wait for something else.

A pear tree painting inside an ornament.
After debating between sculpted paper, cross stitch, and felt, I finally settled on felt.  I had to figure out how make a 3d bird plush, which I'd never done before.  Normally I just sew two flat pieces together and put some stuffing inside.  I did some research and found out the partridge referred to was most likely a red-legged partridge, so I tried to make it look like that.  They have a lot of color changes in their feathers, so it's not perfect, but I'm cool with it.  Then I threw in some real twigs with some felt leaves and pears, and done!

If you like it, you can pre-order it for $10 through the end of November, and then the prices go up to more accurately reflect the time and effort put into them.  Also, if you're missing any previous year's designs, I found a bunch of half finished things that I'm going to try to finish up and put in the shop so I can be rid of them.  Keep an eye out for those as well!


Get the flash player here: http://www.adobe.com/flashplayer

October 30, 2011

Happy Halloween!

This year, DS and I made our costumes from things we already owned.  I'm Totoro, and he's Yukon Cornelius.  Mine is a little disheveled from dancing.  Happy Halloween!


October 23, 2011

Pumpkins

It would seem DS and I are developing a habit of being with our niece and nephew for carving pumpkins.  I just spent some time looking for last year's post about it, but it would seem it was during my "I forgot I had a blog for 6 months and all these posts are really back-posted" phase.  Lucky for you, I did take photos that were saved somewhere.

"Jack" or a princess.  Carved for (and with a some help from) Dorian.  The glitter was all her, but once it was lit up, I was in love.  -2010
Last year we had flown down to South Carolina for DS's mom's birthday, which isn't long before Halloween.  His grandmother Marie was also in town.  It was a really lovely trip, and DS and I enjoyed hanging out at his sister's house and carving pumpkins with the kids.

We thought this year we'd go back to having pumpkin carving parties at our place, especially now that we actually have friends here in town.  However, life seldom goes as planned, and this time we found ourselves in West Virginia.  Both of DS's grandmothers live there, and we were met by his sister and her family.  Wouldn't you know that the same grandmother from the last year's pumpkin carving had gotten pumpkins this year too?  I was not expecting that, but I was happy.  Carving pumpkins is one of my favorite fall things.  Not that that list is things is short.

The kids this year.  It's hard to believe how old they are.  <3
This year I ended up carving both pumpkins, though the kids cleaned them out on their own.  There was only one good carving knife, and even that was long and very sharp.  They have a healthy fear of knives after an accident last year.  Miles started out wanting a scary pumpkin, and we sketched out designs until he was happy.  And then he decided he wanted a pumpkin for God.  And the end result is probably more scary than his "scary" design, but he was happy with it.

Hearts=Jesus / Cross / Ears=Bibles / Fish

Dorian wanted something scary.  She took some time (interrupted several times by the need to run away from some bees that kept pestering us) before deciding on a ghost.  Carving out those little eyes and mouth with the big knife that I had was tricky.  And everyone was terrified that I was going to slice my fingers off when I was trying to shave down the skin for the rest of the ghost.  Dorian even made me show her my hands a few times to assure her they weren't bleeding.  She topped this one off by stabbing in "the head."  By the time we took the photo, Marie had reclaimed her knife.  You can still make out some stab wounds by the light shining through the slit though.

A ghost with stab wounds.
As with last year, we decided these pumpkins were enough carving for this Halloween.  Now we're looking forward to seeing the girls in his family when they visit us in December to see the Nutcracker.

September 14, 2011

Three Decades

I'm officially in my 30's.  Since leaving Madison, a lot of the people that we tend to hang around are still in their mid 20's, and I can see the fear in their eyes when I tell them how old I am now.  I kind of enjoy it.  Truly, being 30 is no different than being 29.  Except that I find myself terribly excited.  Wait, was I excited last year?  (checking...)  Nope, I didn't even get around to making a birthday post.  Shocking!

Gifts from my mom, so I can "party."
I'm tolding a woman's 30's are the best years of her life.  Something about being comfortable in your skin and the bedroom.  I don't know how much of a difference a year will really make on the latter, but I can tell you that I feel 100 times better in my skin than I did this time last year.  Have I mentioned that I've lost 18 lbs?  Bri has been keeping me on a pretty tight workout schedule.  I even wore a real bikini at the beach last weekend for the first time in years.  Aside from the sunburn, it was awesome.  I'm not saying there aren't still things that need work.  Just that for the first time in a long time, those things are not something I think about constantly.  I am content.

I spent my birthday lounging around the house reading, and then several hours of band practice.  Tonight the band has a show at Millcreek Tavern, and we're debuting two new songs.  Songs I helped write!  Bri surprised me with a homemade cake, which was so delicious.  It actually had 30 candles on it, and it looked like it was some castle torch.  I don't even remember the last time I had candles on a cake for my birthday, and it made my day.

Bri with my Birthday Cake/Torch
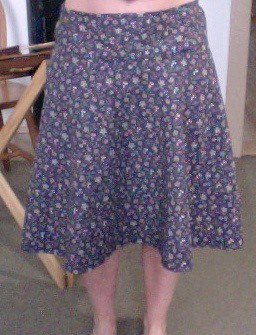
DS showered me with gifts this year.  I finally own Settlers of Catan, which makes me so happy, even if you do need three people to play it.  I have my first 3DS game, Ocarina of Time.  And best of all, a serger!  This last gift has inspired me to get back to sewing.  I dug out a skirt pattern I bought a year ago, along with some fabric I'd been hoarding, and got to work.  I've never made anything from a patter before, but I'm pretty happy with how it turned out.  It fits and has a zipper and everything.  I didn't bother lining it, or using interfacing (I don't even know what it's for, stabilization I suppose).  I figure I can get into all that stuff later.

A horrible photo of the skirt I made.  The lumps are because I have shorts on under it.
This weekend DS and I will be attending the wedding of one of my favorite people, Luke.  Which means we're heading back to Madison for the third time this year.  The weather is supposed to be lovely, upper 60's, and I'm very excited.  The rest of this week should be lovely.

September 30, 2010

Not too Shabby

Life around here has been pretty mellow.  A lack of immediate friends will do that.  Also, DS has been scarce because teaching has swallowed him whole.  I'm just happy if he's home by 7 and not completely catatonic.  It's a good thing those notes he's making can be used in future classes...

So I've been celebrating little things.  Why not?  Tuesday was DS's birthday.  I didn't give myself time to make him a treat, (and honestly, after the birthday cupcakes I made myself which were so nasty that we threw them all away, that's probably a good thing) so I picked him up a little cake and two of his favorite ice cream flavors.  Well.. I'm guessing he'll love that Baked Apple Dumpling.  He does love apple pie like crazy.


He got all kinds of sweet presents, including a new lens and flash for his fancy pants camera.  I'm told he took cool pictures at Maker Faire, but I have yet to see them (see above).


My most recent sewing triumph is this new cushion for the window seat.  It's corduroy, so it's super soft.  I even put a zipper on one end in case it needs washing.  Felix has claimed it, which is to be expected.


She's a little confused at my coming near and not loving her...

I love this set up, because it's the perfect length for me to stretch out and lean back against the pillow and read books.  And thanks to a helpful tip on Facebook from a family friend, I picked up some shelf liner to keep the cushion from sliding.  And also the couch (thank god, for real; hardwood floors are slippery), and the craft station table top.  Finding that in the grocery was way easier than dragging myself to someplace like walmart...

March 24, 2010

Multiple Successes and Random Updates

After more than a year of periodically going to Goleta Beach looking for sea glass, Samantha makes me go to Arroyo Beach and we find a crap load.  Neither of us had been to that one before, and we were so surprised.  The beach is really rocky along the shore, then turns to sand, and then giant cliffs with uber fancy houses on top.  We made the mistake of walking it barefoot.  It probably would have been nice in the sand, but once we realized that sea glass was abundant, we stayed in the rocks.  Ouch.

Sore feet is a small price to pay for this megaload of sea glass though!  We even found two small cobalt blue pieces.  Most are white and green, and there's a fair amount of brown.

Double Success:  I bought a diamond tipped drill bit for my Proxxon today, and managed to get a nice little whole in my practice piece.  That means I can start making real sea glass jewelry now!!

Speaking of successes, I purchased one of those "as seen on tv" planters that grows vegetables upside down.  This particular one is meant for pepper plants, and I got a "six alarm combo pack" of peppers to go in it.  And then, because I don't like peppers, I got myself basil and rosemary.  I hope it actually works.  Though I'm a little nervous about our sunlight situation.  And also the cats.

While I was at it, I re-potted all of my plants, finally getting rid of some dead ones that had been languishing on the porch for six months.  My aloe and catnip are doing excellent, so if you want some... let me know.  Also, the porch has been cleaned finally!  (it's coated in some kind of high gloss paint, and is always covered a thick layer of dirt due to lack of rain, dust, and occasional fires)  We'll see how long that lasts.

DS is having success as well.  We'll be in Chapel Hill from April 8-12 to see if we want to live there.  Anyone going to be around there then?  Any suggestions for things to do/see that might entice us?  Would you recommend it?

Also, it looks like we'll be in the DC area the weekend of May 22 for a wedding.  I've never been there.  Not sure we'll have much spare time, but just in case, feel free to send me suggestions for awesome things there as well.

September 24, 2009

Progress

My mother requested a custom scarf as a present for someone. She wanted something in purple that included hearts. I've been studying anything woven I can ever since I bought my loom, so I knew a heart pattern was possible. Of course, I had never done anything other than a plain weave, with my only experiments thus far being in color placement in the warp and weft. So I decided to take this challenge! And it was a challenge, though thankfully one I could handle. I tried several different techniques from the only book about weaving in the entire Black Gold Library system (which is a terrible shame), and finally settled on the loop effect. It would seem inlays are best made with different yarns, with the thicker yarn used for the pattern. The contrast helps make the pattern visible. Since I was using two identical yarns (other than color), I had to make the pattern really stand out to keep it from blending into the background. The end result is an identifiable shape that is puffy. I have to say, I really like it.

+:
soft
puffy
looks pretty cool

-:
one sided
hard to weave in the ends of the pattern yarn...

I do think I could get the pattern on both sides, though it would increase the working time by quite a bit, and use a lot more yarn. I'll have to experiment.

I have an order for six scarves to be sold in a family member's store. I decided that I needed to buy yarn in bulk to help keep costs down (seriously, yarn in my local craft store is EXPENSIVE), and found this site called Smiley's Yarns. I'm almost ashamed to admit how much I bought.. but I will use it, and a good selection on hand will help my creativity. And I keep telling myself that at least I took advantage of the expensive flat rate shipping; got my money's worth there! More importantly, they have some HUGE discounts on their sale yarns, so the cost of materials going into each project will be drastically reduced. It's kind of a weird site though, and I got nervous today and checked the BBB, just in case. Luckily, they have a good rating. Probably should have checked that before giving them my CC information.. :P oh well, what are you going to do?

Finally, the 2009 ornament is coming along, and they should be done by November 1. I am taking pre-orders, which will help me know how many to make. So if you want one, let me know! You won't have to pay until they are ready for shipment, so don't worry about possibly hating the design (though so far, I have gotten really good feedback from the people I've shown it to)!

June 27, 2009

Elephant

DS and I have an elephant rug as part of our themed "jungle" bathroom* (and yes, I know elephants aren't jungle animals). It gave me an idea for something I thought I could actually do for my Shrinky Dink embroidery project.

DS had trouble seeing it... hopefully he's the only one. But if not, let me know what you think would help.

And I'm including the back here because real embroidery people seem to care about these things.

----------------------------------------------------
*I'm too lazy to take a photo of the bathroom, and I can't find a photo of the actual rug online, but I did find parts of the collection here. Turns out it's actually called Monkey Kingdom.

June 24, 2009

Experiments

I had this idea to embroider designs onto Shrinky Dinks a long time ago, and I'm just now getting around to trying it out. After some trial and error and buying a new hole punch, I have my first prototype.

So what we have here is a flat disc that I first embroidered with red floss, then a second time in orange using a shorter line. Straight on it is colorful, vibrant, and sort of reminds me of a sunset. From the side, you get a sense of how many stitches are involved from the height.

It's a good size for a necklace pendant, a brooch (if I had the clasps for it), or even earrings for those that like them slightly on the large side.

This idea is part of my general interest in mixing items of very different textural qualities. I really enjoy the contrast between the hard plastic and the soft thread.

I'm rather new to embroidery, so if you have some tips or ideas, please share them. It takes a lot of planning to make something like this, because all the holes for each stitch have to be punched first, and once the plastic is shrunken they can't be added. I had initially tried doing something more like a picture, but as a first attempt it was proving too difficult for my limited skills. Thus the more simple star burst pattern. Also, I'm a little fuzzy on where the lines are drawn for copyright and selling when embroidery patterns are involved, and chose to avoid them for selling.

Want one of your own? I have lots of colors of embroidery floss, so feel free to ask for whatever you want here.
--------------------------------------------------
Design copyright 2009 Sleep Goblin Crafts

June 10, 2009

Maker Faire / San Francisco Recap

I can't seem to sit down stop playing the Sims 3 long enough to write out a decent post about my first trip to Maker Faire. What I can tell you is that it was amazing, and I met the coolest people. Even though I was utterly exhausted for days afterward, I would have gladly stayed longer to hang out with these people.

Who are these people you ask? Well, to be honest, I didn't officially meet all of them. For some I just hovered near their greatness while praying that I didn't trip over myself or drool too much, drawing attention to just how stalker-ish and fan girl I felt. But I digress. Here is a list, with links to where you'll find them, of the amazing people I met/stood near (while drooling).

Did I say it was amazing?

So here are some photos, with commentary (you may have to hover over "Notes" to see the commentary) of Maker Faire, and then San Francisco itself. I definitely want to go back to both.

These are select images from bigger sets on Flickr. If you want to see all the images, visit the links in the paragraph above.


June 07, 2009

Needle Felting Goodness

One of the amazing areas at Maker Faire was the Needle Felting Playground, a section of the Craft: booth. It was a cozy little area set up with real furniture, like this comfy green couch.

The Needle Felting Playground at Maker Faire

Now, I *think* that couch actually belongs to the lovely lady on the left, one Brookelynn Morris. She is one of the authors of Feltique, an inspiring book that covers the gamut of felt. I had heard of this book before going to the faire, and I wanted the book, but had no idea I would be meeting one of the authors. I'm sort of oblivious that way.

So all weekend there were swarms of people stabbing away at little pieces of wool, making amazing things, while receiving helpful instruction by Brookelynn and Moxie of madebymoxie (whom, sadly, I didn't officially meet; hasn't stopped me from including her in my recent crafty dreams though. seriously you guys, my brain is a crazy place). You can see Brookelynn's photos of the pieces people made on her Flickr site.

Needle Felting 101 with Brookelynn Morris

These ladies also gave how to sessions, and I was able to catch Brookelynn's. Craft: did this wonderful thing where they gave away free goodies at the end of every demo (seriously, the amount of free stuff I snagged at Maker Faire is mind boggling!). So at the end, Brookelynn gave away little needle felting kits with everything needed to make the bauble earrings from her book. Lucky me, I won one!

This is probably my third needle felting kit, and I've been experimenting with the process for probably a year or so now. I feel like I have just enough experience to know what tools I do and don't like, so I'm going to share my findings with you.

Needles
  1. Needles break. Easily. They're jerks like that. In fact, the one that came with my kit broke sometime between me inspecting the kit in the hotel, and taking it out to play with on the drive home. Beyond that, I do not currently have any preferences as to brand, gauge or anything of that nature.
  2. You can use a single needle all on its own if you want. It's probably really good for doing intricate things like this, which I currently have no talent for. Otherwise, I find the single needle to be slow, and I am more likely to break them and/or stab myself this way.
  3. You can also get these little wooden things, which speed up the process. I like that they're wooden and have multiple needles. I don't like the way you have to hold them, or the fact that I still stab myself with them.
  4. What I really really love are Clover's tools. This one is great for mashing things together super fast, especially when those things are flat pieces you're connecting. It holds several needles and has a cover that protects you and the barbs from each other. The cover slides out of the way as you use the tool, but can be locked in place when the tool is not in use.
  5. But the one that makes me happiest is this little baby. I love that I can hold it like a pen. It has three needles in it, which can be replaced if they break, and are close enough together that you have a lot of control over the design still. Both the pen-like design and the close-placed needles make this a good option for sculpting. It also comes with a cap that keeps you from stabbing yourself when you're not currently using it. (Things always manage to end up underneath me when I'm on the couch, which means ouch! if those needles aren't covered. They are SHARP.) You can find this little guy lots of places, both online and in craft stores.
Working Platforms
  1. The first kit I bought came with this block of what feels like upholstery foam. The idea is that you want something to lay the felt on that is soft enough not to break the needle, and thick enough to keep you lap or desk from getting stabbed. Having experienced better things, I have decided I hate this foam. Little pieces of wool stick to it. Cat hair sticks to it. And it's ugly. And it gets dirty. Everything just sticks to it. I hate it. Oh, and I hear it's bad for the environment. So that too. I believe most kits you buy will come with this foam. Boo!
  2. The second thing I bought was the Clover needle felting mat. It's not bad. It uses bristles instead of foam. I have no trouble with cat hair or dirt, though I couldn't tell you its relationship to the environment. It's really nice to use with Clover's chunkier tool mentioned above.
  3. As happy as I was to discover Clover's mat, I was even happier after using the foam that came with my Feltique kit. Wow. This thing is great. Nothing gets stuck to it, it's clean, and it's good for the environment. I love it. You can get these from madebymoxie.
So there you have it. A year's worth of "research" into needle felting. It's pretty easy to get started, as Brookelynn's flickr set illustrates. There's just something about wool that makes my soul happy, and I'm really excited to start incorporating it into my jewelry designs after reading Feltique.

Which reminds me. I finished my kit today!

Please excuse the Winston hair! It's everywhere...
Reblog this post [with Zemanta]